New 120G AGA Build (Rock is in, ready to stock !)

Well I can move the union down, and closer to the pump head, that's not an issue at all.


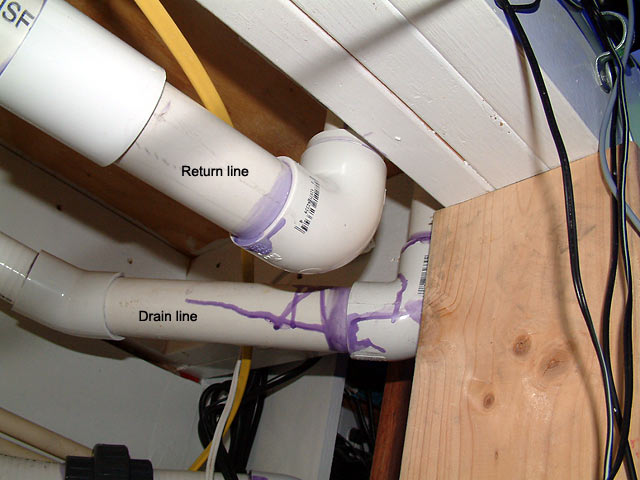
As for the tubing diameter, drains are 1" and returns are 3/4". (thinwall.)

It's a mag 9.5.


On the water change scenario, I had considered putting the tee in the drain lines for just the reason suggested, but, I have been doing 10 - 15 gallon water changes for some time now and have found that's the sweet spot given my load, and feeding regimine.

If I run into a situation where I need to change more than that, then yes, the water level will quickly drop below the overflows, and i will drain the sump. But, the operating volume of the sump should be somewhere in the 25g range, so I should still be able to change about 30G without issue, before the sump is drained completely.


I have done some tests on my current 90, with similar return plumbing and found it's adequate. By the math I did, it looks like I am in the 500 - 600 GPH range with the plumbing which is in use.

I feel like it's a little late in the game to go from 3/4" return plumbing to 1" return plumbing. Is that what you're suggesting Marc ?

BD
 
Yes. To get the flow out of that pump, you double the outlet size. That pump has a 3/4" outlet, so we should use 1.5" plumbing. Seems a bit large to me, so 1" is what I would suggest instead.

I'm more worried that the pump will be starved with the current plumbing. If anything, that is the area to increase the plumbing diameter.
 
So I would increase the diameter all the way up to the bulkheads ?


My bulkheads are 1" for the returns, so that's the choke point anyway.


I had made the assumption that providing consistent size pipe throughout would make it more efficient.


If you feel like I will achieve better output and flow thru the mag 9.5 by running 1" up to the bulkheads, and then 3/4" from the bulkhead to the output from the loc-line, I'll make the changes before I start to fill tomorrow evening.


Brad
 
Yes, I would keep them large until you absolutely have to reduce. Use a bushing at the bulkhead point. My plumbing under the 280g reef is 1.5" all the way until I get to the 1" bulkhead, and then it reduces to 3/4" at the locline unfortunately.

More volume going into a smaller area tends to work better than pushing water through a narrow diameter the entire time. Elbows along the way add further restriction. SpaFlex helps avoid those tight corners by eliminating them entirely and using soft bends instead. Just FYI, not a recommendation you change everything now.

In this picture, the horizontal pipe is 1.5". As it goes up to the bulkhead, you can barely see the 1" pipe going to the bulkhead.
return_elbow.jpg
alt="">

Another shot where you see more of the 1" pipe. I did it like this so that if I had to change the plumbing one day, I could cut it with a sawsall or hacksaw and still have some pipe exposed to glue a new fitting to.
return_reduction.jpg
alt="">

Here's the final view. The closer bulkhead is the drain, the other is the 1" return.
return_bulkhead.jpg
alt="">
 
Very nice.


I am going to HD today to get 1" fittings for my return plumbing, and I will just step-down from the 3/4" lines, into the 1" plumbing.

I may also consider upgrading the drains too. Don't know yet.

Brad
 
Finally got the plumbing glued into place, and just the way I like it.


Here are some shots. Pardon the starnge man in the picture, my photographer tonight broke the cardinal rule.


No "ME" on the camera.

brad

Pink Foam Installed
pink-foam.jpg
alt="">

Drains and Returns
flow.jpg
alt="">

Increased return plumbing from 3/4 to 1"
new-pump.jpg
alt="">


pump.jpg
alt="">


Plumbing view from behind the tank.
rear-plumb.jpg
alt="">
 
It looks good. If your pump seems somewhat noisy, a mousepad underneath will help.

If you see microbubbles, remember it can take up to 14 days for the new plumbing to slime over. As long as you don't see microbubbles in the return section (use a flashlight), the bubbles should go away soon enough.
 
Hey,


Did anyone happen to notice i glued the Disconnect coupling and the ball valve to the pump BACKWARDS !

DOH.

Well, if this was the only mistake I made, I'll take IT !


CANT WAIT TO FILL THIS *^&%*% UP !

Brad
 
@sublime-1 wrote:
Did anyone happen to notice i glued the Disconnect coupling and the ball valve to the pump BACKWARDS ! said:
I was wondering why you did that, but then I thought, perhaps that was a view from behind the tank.

Regardless, very clean work! 8)
 
if that bulkhead that feeds the pump is threaded on the inside your okay.

what you need, is to be able to isolate the pump from the system for repair or replacement. preferable, you want to be able to do this without draining much of the system.. From what I see you could buy a threaded plug for inside the sump, and close the valve on your return and be able to remove the pump by breaking the union. If you had the space I would add a valve and union to the pump suciton but it looks like you don't have the room.
 
Basically the pump is hooked up like this.


Outlet - 3/4" FPT to 1" Reducer.

1" PVC to 1" Threaded Union

1" PVC from threaded union into Solvent 1" Ball Valve
Solvent 1" ball valve, 1" PVC into plumbing.


So, In essence I can disconnect the pump by just unscrewing the threaded union, and plug the inside of the threaded bulkhead on the Sump. I bought a plug to keep around just for such an occasion.


Really my only screw up (as far as layout goes.) was the glueing of the pump plumbing into the main plumbing structure without turning it so that the ball valve knob would be to the front. Not a big deal, but would make it easier to work on.

Maybe I'll cut it out and just take one of my spare 1" to 1" unions and make a repair after turning it 180 degrees.

Or just leave it.

Ha Ha.
 
Mine is set up the same way. I screw in a plug in the bulkhead to stop the flow of water, and close the valve on the return line to extract the return pump.
 
So...


I replaced the Pre-Filter (sediment) and the Carbon Filter in my Kent HI-S with just regular one's from Home Depot.

The Sediment is a 1Micron and the Carbon says 1-4 Micron on it.


I ran about 60 gallons through it and measured the TDS. It's measuring 4 - 6.


I realize we are striving for 0, and I know I need to replace my DI canister, but I am wondering if this is still low enough to start filling my 120. I need to get it started because it's only a 35 GPD unit so it's going to take several days to fill the tank and sump.


Brad
 
I would prefer to not exceed 6 TDS, but anything under 10 is fine. Many would say it has to be absolute 0, but if your tap water is 200 and you are putting in 4-6, I think you'll be okay.
 
Sublime-1
I will be watching your thread closely because I will be plumbing in the same tank. I am interested to see how those dursos work out for you.
Looking nice.
 
I got my new DI canister so after I run a few gallons thru it to condition the new DI bed, I'll be filling it, Probably tonight...


What's the token answer on how much water to waste before using the DI output for Aquaria use ?

Thanks
 
Normally, none. DI resin is ready to use from the first drop that passes through it.
 
Thanks Marc.


I am filling it up as we speak, Pumped about 15 gallons just overnight. After I replaced the DI and the carbon and prefilters my TDS went from 6 down to 1-2 . .bouncing between 1 and 2.


Tap water reads 240.
 
Progress

water.jpg
alt="">


Had to run the RODI thru the window from the hose since the laundry room is a little too furr away.

BD

water2.jpg
alt="">
 
Top