TiberianSun
Premium Member
First I would like to thank Marc and Lindsay for answering questions as we started this project. We figure the process will take us about 3 months to complete so I will do my pest to update with notes & pictures as we go. Now for the build:
The wife & I had been thinking of upgrading to a larger tank that would replace our current 92G Corner tank. So while thinking of tanks in the 300G range she came across a setup which we opted to jump on. I had to rent a Uhaul truck to pick it up and once we got it home it sat in our garage while so we could put together a game plan and finished a construction project in our basement (Yes, we live in Texas and have a basement). We selected the basement as the location because the temperature is more consistent even in the summer and the area is next to the garage where we will be able to set up the sump/filtration/pumps as well as the ATO tanks.
The plan for the tank is to build a mostly Softies and some others. Also we have several Tangs which are getting to a size where we feel they need more space to roam and play.
Here is the list of parts so far:
450G TruVue Tank with island overflow, bare bottom
180G TruVue Sump
Pump - Reeflo barracuda/hammerhead hybrid
Skimmer – My Reef Creations ORCA Pro 1
Lights – planning to use LED. Looking at Build My LED
AQUA UV Classic 80 Watt
Flow – Tunze at this point.
Stand – Custom wood/metal
Hood - none
When we planned the layout of the room we decided to remote the sump, skimmer, and pump because the area under the tank was very tight. Also we noticed that the floor under the tank wasn’t level so we decided to build a metal insert stand to carry the load of the tank since the stand can’t be shimmed. The stand has no main horizontal, vertical nor diagonal bracing to take the load. I have no idea how the stand was able to hold a filled tank and be structurally sound. When finished the stand will basically become a nice skin.
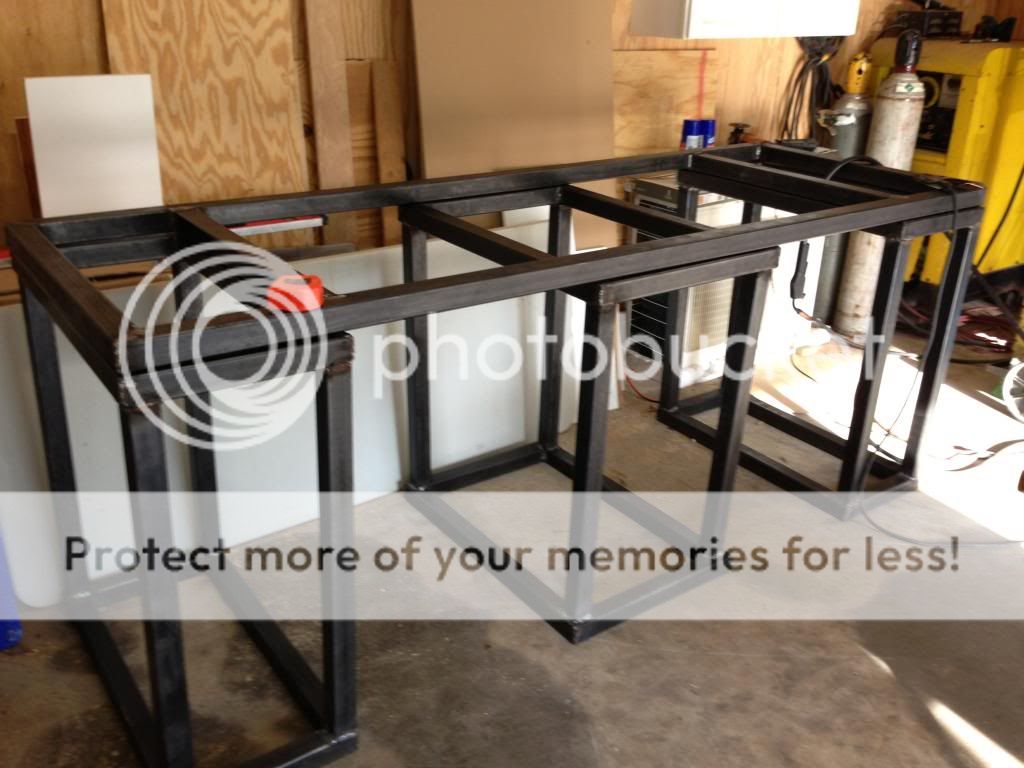
For the metal portion we went with 2x2 square tube steel that is 1/8” thick. Slightly overkill but I’ll sleep knowing it will never collapse. Also at 1/8" it wouldn't be as easy to burn through when welding it together. The weight is carried through the 3 vertical sections and the entire top part will be separate so we can adjust for the floor not being level. We opted to no use adjustable feed because the weight load is only carried at a single point and I didn’t want to take any chances. The shims are cut from scrap pieces of the metal framing and backed up with stacked metal washers. Also this design will make it easier to move into the house and also allows us space for shelves in the future.
 alt="">
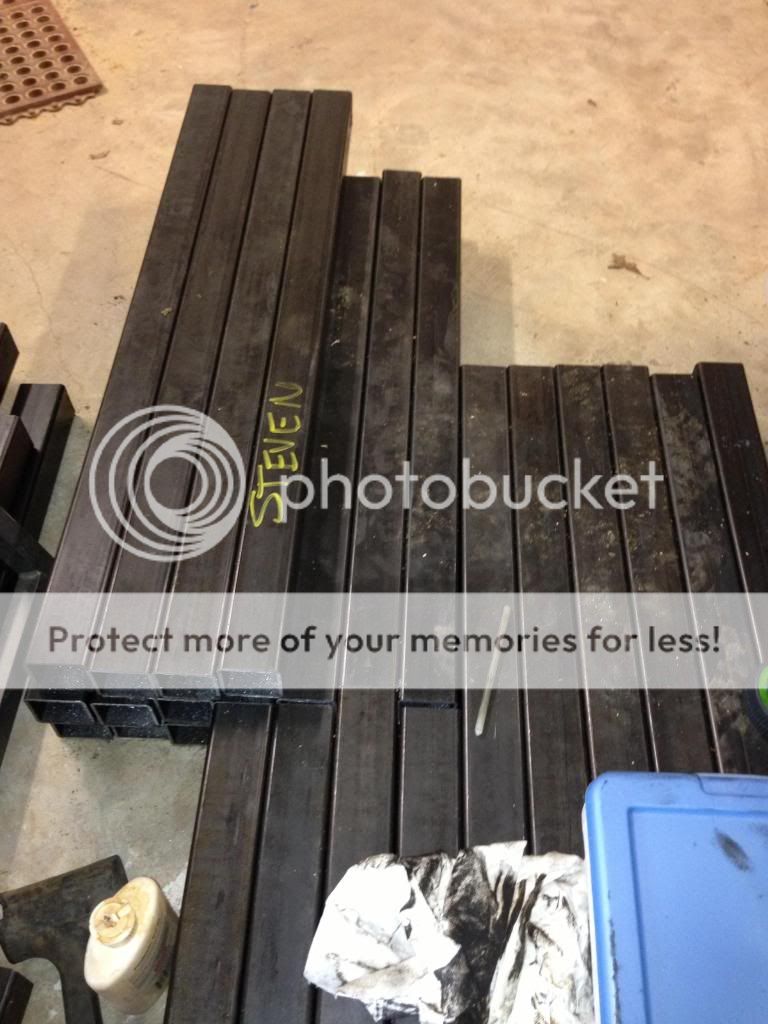
Steel after being cut. Actually didn’t take as long as I thought.
 alt="">
Finished Product. You will see the lack of the diagonal braces. After welding it all together it became clear we wouldn’t need them. The frame is solid. We do plan to connect the different parts together via 1/8” metal 90 degree straps but not until the tank is on the stand with water to allow for sagging. Shimming was a pain but that is life with a house built in 1955. By the way welding in the summer time sucks!!!!!
 alt="">
It will be installed inside this. This is the original wood stand. This is all the structure that existed when it was built. No diagnal or horizontal bracing the length of the tank. No 4x4 structure or even 2x4. I still can’t believe it didn’t collapse. One cool part is the stand comes apart into 3 pieces. The original builder cut it the length of the tank so it would fit through a standard house door. The top is 2 sheets of ¾” ply wood.
 alt="">
Metal insert inside the wood stand. Still had to shim the top of the metal framing more than I wanted but that’s life with a house built in 1955. Also the other side of the blue wall is where the garage is. That is where the supporting equipment will be installed.
 alt="">
The wife & I had been thinking of upgrading to a larger tank that would replace our current 92G Corner tank. So while thinking of tanks in the 300G range she came across a setup which we opted to jump on. I had to rent a Uhaul truck to pick it up and once we got it home it sat in our garage while so we could put together a game plan and finished a construction project in our basement (Yes, we live in Texas and have a basement). We selected the basement as the location because the temperature is more consistent even in the summer and the area is next to the garage where we will be able to set up the sump/filtration/pumps as well as the ATO tanks.
The plan for the tank is to build a mostly Softies and some others. Also we have several Tangs which are getting to a size where we feel they need more space to roam and play.
Here is the list of parts so far:
450G TruVue Tank with island overflow, bare bottom
180G TruVue Sump
Pump - Reeflo barracuda/hammerhead hybrid
Skimmer – My Reef Creations ORCA Pro 1
Lights – planning to use LED. Looking at Build My LED
AQUA UV Classic 80 Watt
Flow – Tunze at this point.
Stand – Custom wood/metal
Hood - none
When we planned the layout of the room we decided to remote the sump, skimmer, and pump because the area under the tank was very tight. Also we noticed that the floor under the tank wasn’t level so we decided to build a metal insert stand to carry the load of the tank since the stand can’t be shimmed. The stand has no main horizontal, vertical nor diagonal bracing to take the load. I have no idea how the stand was able to hold a filled tank and be structurally sound. When finished the stand will basically become a nice skin.
For the metal portion we went with 2x2 square tube steel that is 1/8” thick. Slightly overkill but I’ll sleep knowing it will never collapse. Also at 1/8" it wouldn't be as easy to burn through when welding it together. The weight is carried through the 3 vertical sections and the entire top part will be separate so we can adjust for the floor not being level. We opted to no use adjustable feed because the weight load is only carried at a single point and I didn’t want to take any chances. The shims are cut from scrap pieces of the metal framing and backed up with stacked metal washers. Also this design will make it easier to move into the house and also allows us space for shelves in the future.
 alt="">
Steel after being cut. Actually didn’t take as long as I thought.
 alt="">
Finished Product. You will see the lack of the diagonal braces. After welding it all together it became clear we wouldn’t need them. The frame is solid. We do plan to connect the different parts together via 1/8” metal 90 degree straps but not until the tank is on the stand with water to allow for sagging. Shimming was a pain but that is life with a house built in 1955. By the way welding in the summer time sucks!!!!!
 alt="">
It will be installed inside this. This is the original wood stand. This is all the structure that existed when it was built. No diagnal or horizontal bracing the length of the tank. No 4x4 structure or even 2x4. I still can’t believe it didn’t collapse. One cool part is the stand comes apart into 3 pieces. The original builder cut it the length of the tank so it would fit through a standard house door. The top is 2 sheets of ¾” ply wood.
 alt="">
Metal insert inside the wood stand. Still had to shim the top of the metal framing more than I wanted but that’s life with a house built in 1955. Also the other side of the blue wall is where the garage is. That is where the supporting equipment will be installed.
 alt="">
 alt="">
 alt="">
 alt="">
 alt="">
 alt="">
 alt="">
 alt="">
 alt="">
 alt="">
 alt="">
 alt="">
 alt="">
 alt="">
 alt="">
 alt="">
 alt="">
 alt="">