Bubble trap tower

[From a discussion earlier that I pretty much hijacked I decided to start a new thread about a remedy to bubbles in my tank.

I saw the video of a tower with LR that Marc had created on his website that seemed to work well. But, last night at the meeting he stated he had a couple of other ideas.

Marc could you please expand? Also, if anyone else has some ideas fire away!

Here is my dilemma:
I have a 90g tank and not alot of space under for a sump. So, I converted my old 29g into one. This contains my skimmer, skimmer pump (submerged Dolphin 1200) and a few baffles.

My return pump is a GenX that is rated at 1200gph. My estimates are it's pushing around 800gph after head loss. So, I've got some serious flow that I really don't want to reduce if I don't have too.

This past weekend I added two more baffles that took alot of the bubbles out of the main system. But, the drain line produces a crazy air/water mixture that I beleive if I can break up prior to the baffles should really help.

Check out the pics in my gallery HEREover on RC. Please note that these pics are not updated, but you get an idea of how my sump is setup.

Thanks for any help.
Kurt]


Edited By Modo on 1092327316
 
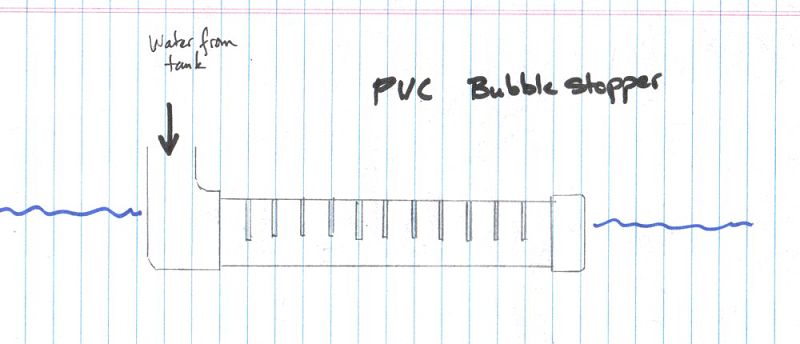
[Here is one method that works to reduce bubbles before they enter your sump.

pvc_cut.jpg
alt="">

For Peter's sump, I actually made a stand alone tower that was taller than his water line. It might even be a little taller than his sump. It had openings at the bottom, and a series of baffles angled upwards stacked above each other, criss-cross. What happens is the water pours down into the tower, and has to zig zag to the base to get out. We did this because the water was going to pour into his refugium and I didn't want that zone to be blasted. The upward angled baffles would allow the air bubbles to rise upward, baffle by baffle until they came out.

The reason the tower was so tall was to avoid saltspray and to make sure the water didn't overflow the tower. When I made it, I told Peter if it didn't work he could just toss it out, but he told me it has worked perfectly.

On a sump I built for Brian, I put some baffles in the intake compartment where he has two drain lines entering. It worked as well, but not as nicely. He had to drill a couple of holes so that the air could vent out (above the water level), but I don't think he ever had microbubble issues.

bubble_baffles.jpg
alt="">]
 
[I will try that PVC version out first before I spend a day making that tower. That is a really good idea tough.

Just a couple of questions:

1) Is that a cap on the end of the PVC?
2) Do you really keep the line above the water's surface?
3) If so, doesn't water shoot our the slits with a pretty good force and spray everywhere?]


Edited By Modo on 1092335650
 
[Yes, it is a cap. You want it at the water line so that water pours out and air breathes out.

The more slits, the less shooting. LOL Cut the slits on a table saw or with a circular saw or dremel. They should be at least 1/8" wide.]
 
[Right on. I'll try it out this weekend and see if it helps. I'll probably go with 1.25" pipe to give it some disspersion room and help with any built up pressure.

Too bad my chop saw is on lone. I'm going to have to do this one with a circular. Wish me luck! :shocked:]
 
[Having this problem on my return line also, it's bubble city. I wonder if putting a vent in the line would help? By vent I mean a T fitting in the horizontal section of the line with a short pipe sticking out of it.]


Edited By the3dwizard on 1092528220
 
[The "return" line is the line that brings water back up to the tank, at least in my version of sumpology 101. Is that really your problem area, or are you talking about the drain line?

Some people on RC have made a "reverse-durso" where the water pours down into an elbow that flows into a Tee. Water goes out the bottom while a vented cap is on the top. I should have a link handy....

http://www.reefcentral.com/forums....=354779]
 
[Yep drain. My thinking is the pump feeds the tank and the drain returns the water back to the sump.

I had a similar idea in mind to the vented T. Now to get the parts together and test it out.]
 
[I couldn't find a way to hold the 8" pipe I used for the this, so I didn't go with the saw this time. Once I get my hands back on the chop saw I will though.

But, until then I tried something a little different and used a drill and drilled some large holes in an arc half way around the 1.25" PVC.

This help ALOT, but not as much as I would have liked. So, I will try the slotted as well and see if there is much difference later on. Once thing this did do was keep the level in my durso a bit higher and in turn a bit more quiet. So, far I am very pleased.

Here is what I went with for now.]
 
[Here it is in action. I propped it up with the gate valve of my skimmer. No problems and easy removal for cleaning.]
 
[It looks like it might be a little bit noisy from that picture, but I'm glad it is working for you.

A nice way to keep a piece of PVC from rolling when you have to drill holes or cut slits is to press on a PVC Tee on each end. That will keep it in place perfectly. Once you've finished your task, remove the Tees and install it as originally planned.]
 
@Marc wrote:
[A nice way to keep a piece of PVC from rolling when you have to drill holes or cut slits is to press on a PVC Tee on each end. That will keep it in place perfectly. Once you've finished your task said:
[What a great :idea: , Mark]
 
[Actually the noise isn't too bad. That picture makes it look alot more turbulent than it really is. The drilling went very smoothly. I just left the 90 on and held the thing with my foot on our backsteps and drilled away.

I'm still going to try out the slotted version and compare. I thought about it last night and let out a big "DOH!" when I figured out a way to cut the slots with my circular.

The problem I was facing was the small piece (8" long) was clamping and keeping it from not shooting across the garage. But, then I thought why not cut the slots on the whole 6' section of PVC. This would make it alot more stable and I would be able to clamp it multiple times. Then cut the 8" section last.

I'll try it and post up once I get it finished.]
 
[PS.

Notice in the 2nd picture how I used a 1.25" pvc 90 and just placed the drain line loosely into it. I had a bushing and pipe fitting ready to go, but the space around the drain line help reduce some pressure so water wasn't blasting out of the holes. This help reduce some bubbles and noise.]
 
Top