masharp1126
Membership Expired
Well, thought I'd finally get this thing rolling. Let me warn you right up front that I'm a huge procrastinator. But, with that being said, this project has been in the works for over 12 months so far, time to get it done. My goal is to have the tank completed, water in, plumbing & lighting done, and fish room complete by the end of November.
First, I'd like to mention that a lot of my ideas came from a couple of guys on ReefCentral that go by DSANDFORT and Sean : EbN. These 2 build threads were incredible and gave me so much of the information that I needed to do this. I've read so many plywood build threads on the past 1 1/2 years, but they still fascinate me.
Anyway, let's get started.
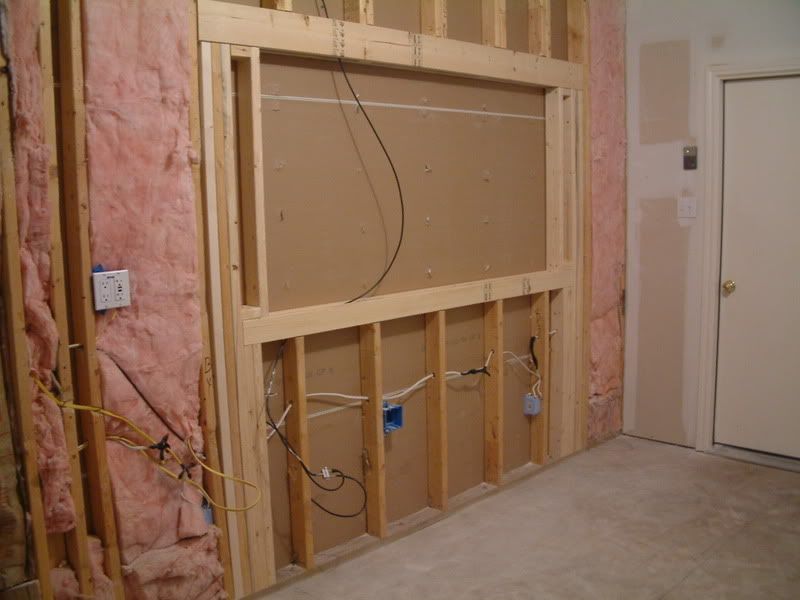
We moved into our home in November of 2006. The home had a 3-car garage, but somewhat different than most. Instead of 3 spaces side-by-side, there were 2 side-by-side, and one of the spaces was 2 deep. L-shaped. The 2-deep side also shared interior walls with my den, as well as with the laundry room. Making it an ideal space for a new fish room with an in-wall tank. In some of the pictures, to follow, you'll see that I walled in the space, installed (3) 20amp circuits, cut the hole for the tank, started the stand, and installed a tile floor. Still a lot to finish up, but it's getting there.
Before we start with pictures, here's some anticipated specs on the tank and fishroom.
Display - 450 gallons
- 72 x 48 x 30
- Coast-to-Coast External Overflow
- Made by Me (Plywood)
- 70% SPS, 20% LPS, 10% Softies
Fish Room
- 15 ft x 10 ft fish room
- One section of a 3-car garage walled in and converted to a fish room
- 3 (20amp) circuits run to the room for all equipment
- Floor tiled and moisture proofed about 6” up the wall
- Utility cabinet and sink will be added. One wall backs up to laundry room and will tap into the water source and drain. RO unit will hang near the sink and tap into the laundry water source as well. Still thinking on how to best collect and use the waste water.
- Cabinets built next to tank stand to house RO water storage tank, salt water storage tank, frag tank, and quarantine tank. Cabinets will also hold controllers, reactors, and supplies.
Refugium
- 78 Gallons (capacity of 103g)
- 42” x 31” x 18”
- Plywood construction, epoxy sealed.
- This will be located under the tank beside the sump. Overflow from the tank will be split between the
refugium and the sump. Refugium will overflow into sump. DSB and Chaeto in the refugium.
- 2 x 39W T-5 bulbs
Sump
- 52 Gallons (capacity of 103g). Total emergency capacity of almost 78 gallons, which should be
enough in the event of a power failure.
- Plywood construction, sealed with epoxy
- Might or might not contain the Protein Skimmer, depends on which skimmer is chosen.
Frag Tank
- 40 Gallon Breeder tank
- 36” x 18” x 16”
- 2 x 175 watt MH w/ XM10Ks (using these because I currently have them from an older tank)
Salt Water Tank
- 40 Gallon Breeder tank
- Used to create new saltwater for water changes. Was thinking of doing 40g water changes weekly, but with a total system capacity of about 650 gallons, might need to rethink it. If I do feel I need to do larger changes, I might add a 2nd 40g breeder and bump my capacity to 80 gallons.
RO Water Tank
- 40 Gallon Breeder tank
- Used for auto top off, as well as to replenish the Salt Water Tank after water changes.
Quarantine Tank
- 40 Gallon Breeder tank
- Stand-alone system with some type of bio-wheel for filtration.
Skimmer
- Undecided. Possibilities include Trigger Systems TS1000, PM XL-2, ASM G5 or G6,
Octopus FDNW-400, or maybe even DIY (not sure where I’ll find the time)
Ca Control
- Balling method to begin with. Adding Kalk and CA reactors in later stages
Display Return Pump
- Reeflo Dart throught 2 1” Seaswirls
Frag Tank Return Pump
- Fed off of return pump
Media Reactors
– Phoshate Removers, Carbon, etc., fed off of return pump to a manifold
Circulation
– Dart return pump through (2) 1” Sea Swirls, Dart closed loop, and 2 Tunze 6200’s to begin
with. Roughly 15,000 gph for a turnover rate of 34X.
Controllers
– Milwaukee PH controller for CA reactor. Ranco dual stage reactor for heaters and chiller (chiller to
be added later). Eventually add an AC Jr for lighting, pumps, and PH monitoring.
Temperature/Humidity Control
– Heater in the sump will provide heat for the tank, when necessary. The temperature in the fishroom will be maintained by a window A/C unit installed in the wall. Exhaust fan installed and controlled by a de-humidistat. A stand-alone de-humidifier in the fishroom (not sure of the size unit yet).
First, I'd like to mention that a lot of my ideas came from a couple of guys on ReefCentral that go by DSANDFORT and Sean : EbN. These 2 build threads were incredible and gave me so much of the information that I needed to do this. I've read so many plywood build threads on the past 1 1/2 years, but they still fascinate me.
Anyway, let's get started.
We moved into our home in November of 2006. The home had a 3-car garage, but somewhat different than most. Instead of 3 spaces side-by-side, there were 2 side-by-side, and one of the spaces was 2 deep. L-shaped. The 2-deep side also shared interior walls with my den, as well as with the laundry room. Making it an ideal space for a new fish room with an in-wall tank. In some of the pictures, to follow, you'll see that I walled in the space, installed (3) 20amp circuits, cut the hole for the tank, started the stand, and installed a tile floor. Still a lot to finish up, but it's getting there.
Before we start with pictures, here's some anticipated specs on the tank and fishroom.
Display - 450 gallons
- 72 x 48 x 30
- Coast-to-Coast External Overflow
- Made by Me (Plywood)
- 70% SPS, 20% LPS, 10% Softies
Fish Room
- 15 ft x 10 ft fish room
- One section of a 3-car garage walled in and converted to a fish room
- 3 (20amp) circuits run to the room for all equipment
- Floor tiled and moisture proofed about 6” up the wall
- Utility cabinet and sink will be added. One wall backs up to laundry room and will tap into the water source and drain. RO unit will hang near the sink and tap into the laundry water source as well. Still thinking on how to best collect and use the waste water.
- Cabinets built next to tank stand to house RO water storage tank, salt water storage tank, frag tank, and quarantine tank. Cabinets will also hold controllers, reactors, and supplies.
Refugium
- 78 Gallons (capacity of 103g)
- 42” x 31” x 18”
- Plywood construction, epoxy sealed.
- This will be located under the tank beside the sump. Overflow from the tank will be split between the
refugium and the sump. Refugium will overflow into sump. DSB and Chaeto in the refugium.
- 2 x 39W T-5 bulbs
Sump
- 52 Gallons (capacity of 103g). Total emergency capacity of almost 78 gallons, which should be
enough in the event of a power failure.
- Plywood construction, sealed with epoxy
- Might or might not contain the Protein Skimmer, depends on which skimmer is chosen.
Frag Tank
- 40 Gallon Breeder tank
- 36” x 18” x 16”
- 2 x 175 watt MH w/ XM10Ks (using these because I currently have them from an older tank)
Salt Water Tank
- 40 Gallon Breeder tank
- Used to create new saltwater for water changes. Was thinking of doing 40g water changes weekly, but with a total system capacity of about 650 gallons, might need to rethink it. If I do feel I need to do larger changes, I might add a 2nd 40g breeder and bump my capacity to 80 gallons.
RO Water Tank
- 40 Gallon Breeder tank
- Used for auto top off, as well as to replenish the Salt Water Tank after water changes.
Quarantine Tank
- 40 Gallon Breeder tank
- Stand-alone system with some type of bio-wheel for filtration.
Skimmer
- Undecided. Possibilities include Trigger Systems TS1000, PM XL-2, ASM G5 or G6,
Octopus FDNW-400, or maybe even DIY (not sure where I’ll find the time)
Ca Control
- Balling method to begin with. Adding Kalk and CA reactors in later stages
Display Return Pump
- Reeflo Dart throught 2 1” Seaswirls
Frag Tank Return Pump
- Fed off of return pump
Media Reactors
– Phoshate Removers, Carbon, etc., fed off of return pump to a manifold
Circulation
– Dart return pump through (2) 1” Sea Swirls, Dart closed loop, and 2 Tunze 6200’s to begin
with. Roughly 15,000 gph for a turnover rate of 34X.
Controllers
– Milwaukee PH controller for CA reactor. Ranco dual stage reactor for heaters and chiller (chiller to
be added later). Eventually add an AC Jr for lighting, pumps, and PH monitoring.
Temperature/Humidity Control
– Heater in the sump will provide heat for the tank, when necessary. The temperature in the fishroom will be maintained by a window A/C unit installed in the wall. Exhaust fan installed and controlled by a de-humidistat. A stand-alone de-humidifier in the fishroom (not sure of the size unit yet).


")