I Built a Sump!

bikerfish

Membership Expired
Check it out! My first attempt at acrylic work. Followed Marc's excellent instructions on his website and guess what, it can be done! It's not as good as "the master" :) but I'm pretty happy with it. I don't have tools to flame polish it, but the edges don't look too bad for a beginner.

I let it sit filled with water for 36 hours and it didn't leak a drop. I was pretty jazzed. 8)

Measures 36 x 18 x 18, which should be about 50g total volume.

Now I just have to get it installed...

Under construction...
DSC02090.jpg
alt="">

Front View. Just dumped water after checking for leaks
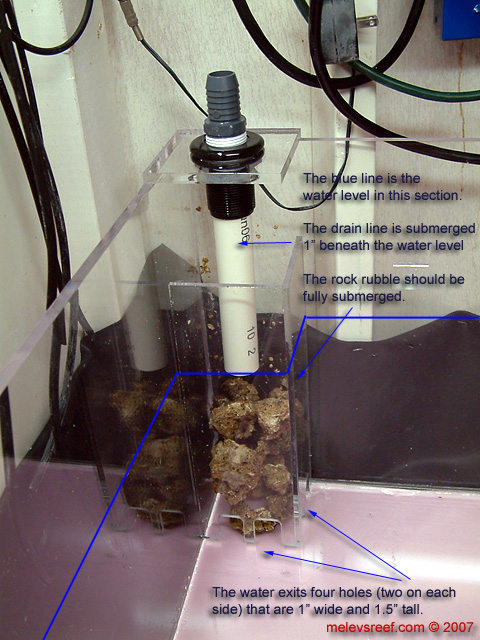
Bubble tower on the right back corner, refugium on the left, return in the center.
DSC02091.jpg
alt="">

Back View
DSC02092.jpg
alt="">
 
i might be wrong but seems like your bubble tower is upside down...bubbles will still be going into your sumps i guess if you fill it with live rock rubble it will be ok...

other than that...looks like one you would pick up dna
 
@kuyatwo wrote:
i might be wrong but seems like your bubble tower is upside down...bubbles will still be going into your sumps i guess if you fill it with live rock rubble it will be ok... other than that...looks like one you would pick up dna said:
LOL... I knew somebody would find something wrong with it. Well, I thought the teeth went at the bottom. I must have seen a photo somewhere, but I can't find one now.

However, blasting the hose into it to fill it, I didn't get any bubbles into the skimmer section out of that tower. Maybe because it's 14" high on it's own. It's designed to be filled with live rock rubble anyhow. And it is sized so I can hang a filter sock on the top when I want to.
 
Ok, found where I saw it. I did it the right way after all. :wink: Since the top of it will be about 1.25" above the water level, the bubbles have no way out except the bottom, which they can't do because, well, they're bubbles.

http://www.melevsreef.com/video/trapped_bubbles.wmv
 
all the bubble towers i have seen have the opening at the bottom. The idea is to have the bubbles rise to the surface and the "good" water exit out the bottom.
 
wow, that looks great, im sooo impressed, wish i had the skills to do this, amazing, so professional looking, nice job man...how much was all the materials, how long did it take ya, would ya do it again
 
Materials totalled about $150, and I have a bunch of odd sized pieces left over. I probably could have done it for $100 if I'd kept the sheet at 4x8, but I bought three half sheets so I could physically maneuver them through my table saw.

I spent the better part of a month to finally get it done, but that's because I had a lot going on. Actual time was probably 4 hours cutting pieces, an hour scraping the edges, a 3-day weekend off and on gluing it together (glue one piece, come back in a couple hours, move the clamps and glue another piece, repeat), and then about an hour routing off the extra edges to smooth it all up.

Would I do it again? If I buy another tank, yes. For fun and profit? No way. It's fun as a personal project, but I wouldn't want to try to make it for someone else. I'm sort of a perfectionist, and it would stress me out.
 
You did a great job.
clap.gif
alt="">

Here's a bubble tower image:

bubble_tower.jpg
alt="">
 
what are you guys using to cut such nice edges on the acrylic ?

Roto-Zip ? Dremel ? Scroll Saw ?


Any particular blade ?
 
sublime-1 wrote:
what are you guys using to cut such nice edges on the acrylic ?quote]

I use a nice Freud blade w/ lots of teeth made for cutting acrylic on a table saw. I finish mine off by sanding and it is pretty smooth. Marc used a jointer at one time I know to finish his off nicely, not sure if he still does. The pros also will fire polish the exposed edges when all done and that is the finishing touch.
 
Wow, very impressive. =)

I'm, by no means, good with my hands, so stories like that never cease to amaze me.
 
Thanks for the compliments.

I used a 10" table saw with an 80 tooth blade to cut all the pieces. Then I have a $5 scraper I picked up at regal plastics, that removes all the saw marks (manually) in about a minute.

After it was all assembled, I used a laminate router bit to trim the extra edges super close. Set at 8000 rpm, it left a nice finish. Mistakenly set at 1000 rpm (on my test piece, than god) it was not pretty. :)

Marc flame polishes his which I'm assuming slightly softens the plastic just enough that it "blends" together for a smooth polished look. I don't have a torch, so mine is just the way the router left it, which is pretty good anyway.

You could probably use some super fine wet/dry sandpaper to polish it some too.

Marc's website has a TON of very helpful photos and instructions. I'd never done this before, so there's a testimonial.

I got it installed last weekend, and boy did I get lucky. Evidently I miss-measured the space I had on the end of the cabinet for width. I thought it was a 19" opening, so I made the sump 18" wide, thinking that left me 1" of play. Oops! The opening was actually 18 1/8" wide! It just BARELY slid through! I thought I was going to have to take my router and shave off a little of the uprights to gain some extra millimeters of clearance! :roll:
 
The only areas I flame polish are the inside edges of the top flange, the tops of the baffles, the top of the bubble tower and the edges of the probe holders. I don't polish any glued seams.

The owner of Bermuda Aquatics told me he flame polishes seams after they've cured for 7 days, but James at Envision Acrylics says to never do that.
 
Top